Note: This is part 2 of the most recent blog update. This post will be covering changes that were made in the back-end and will be split into two major sections - security and blog functionality.
This time, we will be covering the changes that were made to the back-end. To start, I chose to create a Spring Framework-backed REST API using Java as I already had some prior experience working with Spring Framework, and it seemed more relevant compared to the only other web framework I have experience with - Python's Flask framework. Python typing would have definitely made providing responses in the API significantly simpler, but since Typescript pretty much enforces knowledge of return types on the front-end, there was almost no benefit to relying on a dynamically typed language for simplicity. Of course, in order to properly interact with our load balancer and allow for proper securing of user information, there needed to be a layer dedicated to managing authentication and authorization. Spring Security was used to cover this need, but there were a few quirks that needed to be dealt with due to Spring Boot's opinionated nature setting up defaults that would be detrimental to our actual application.
The general flow of authentication and authorization can be seen in the diagram below:
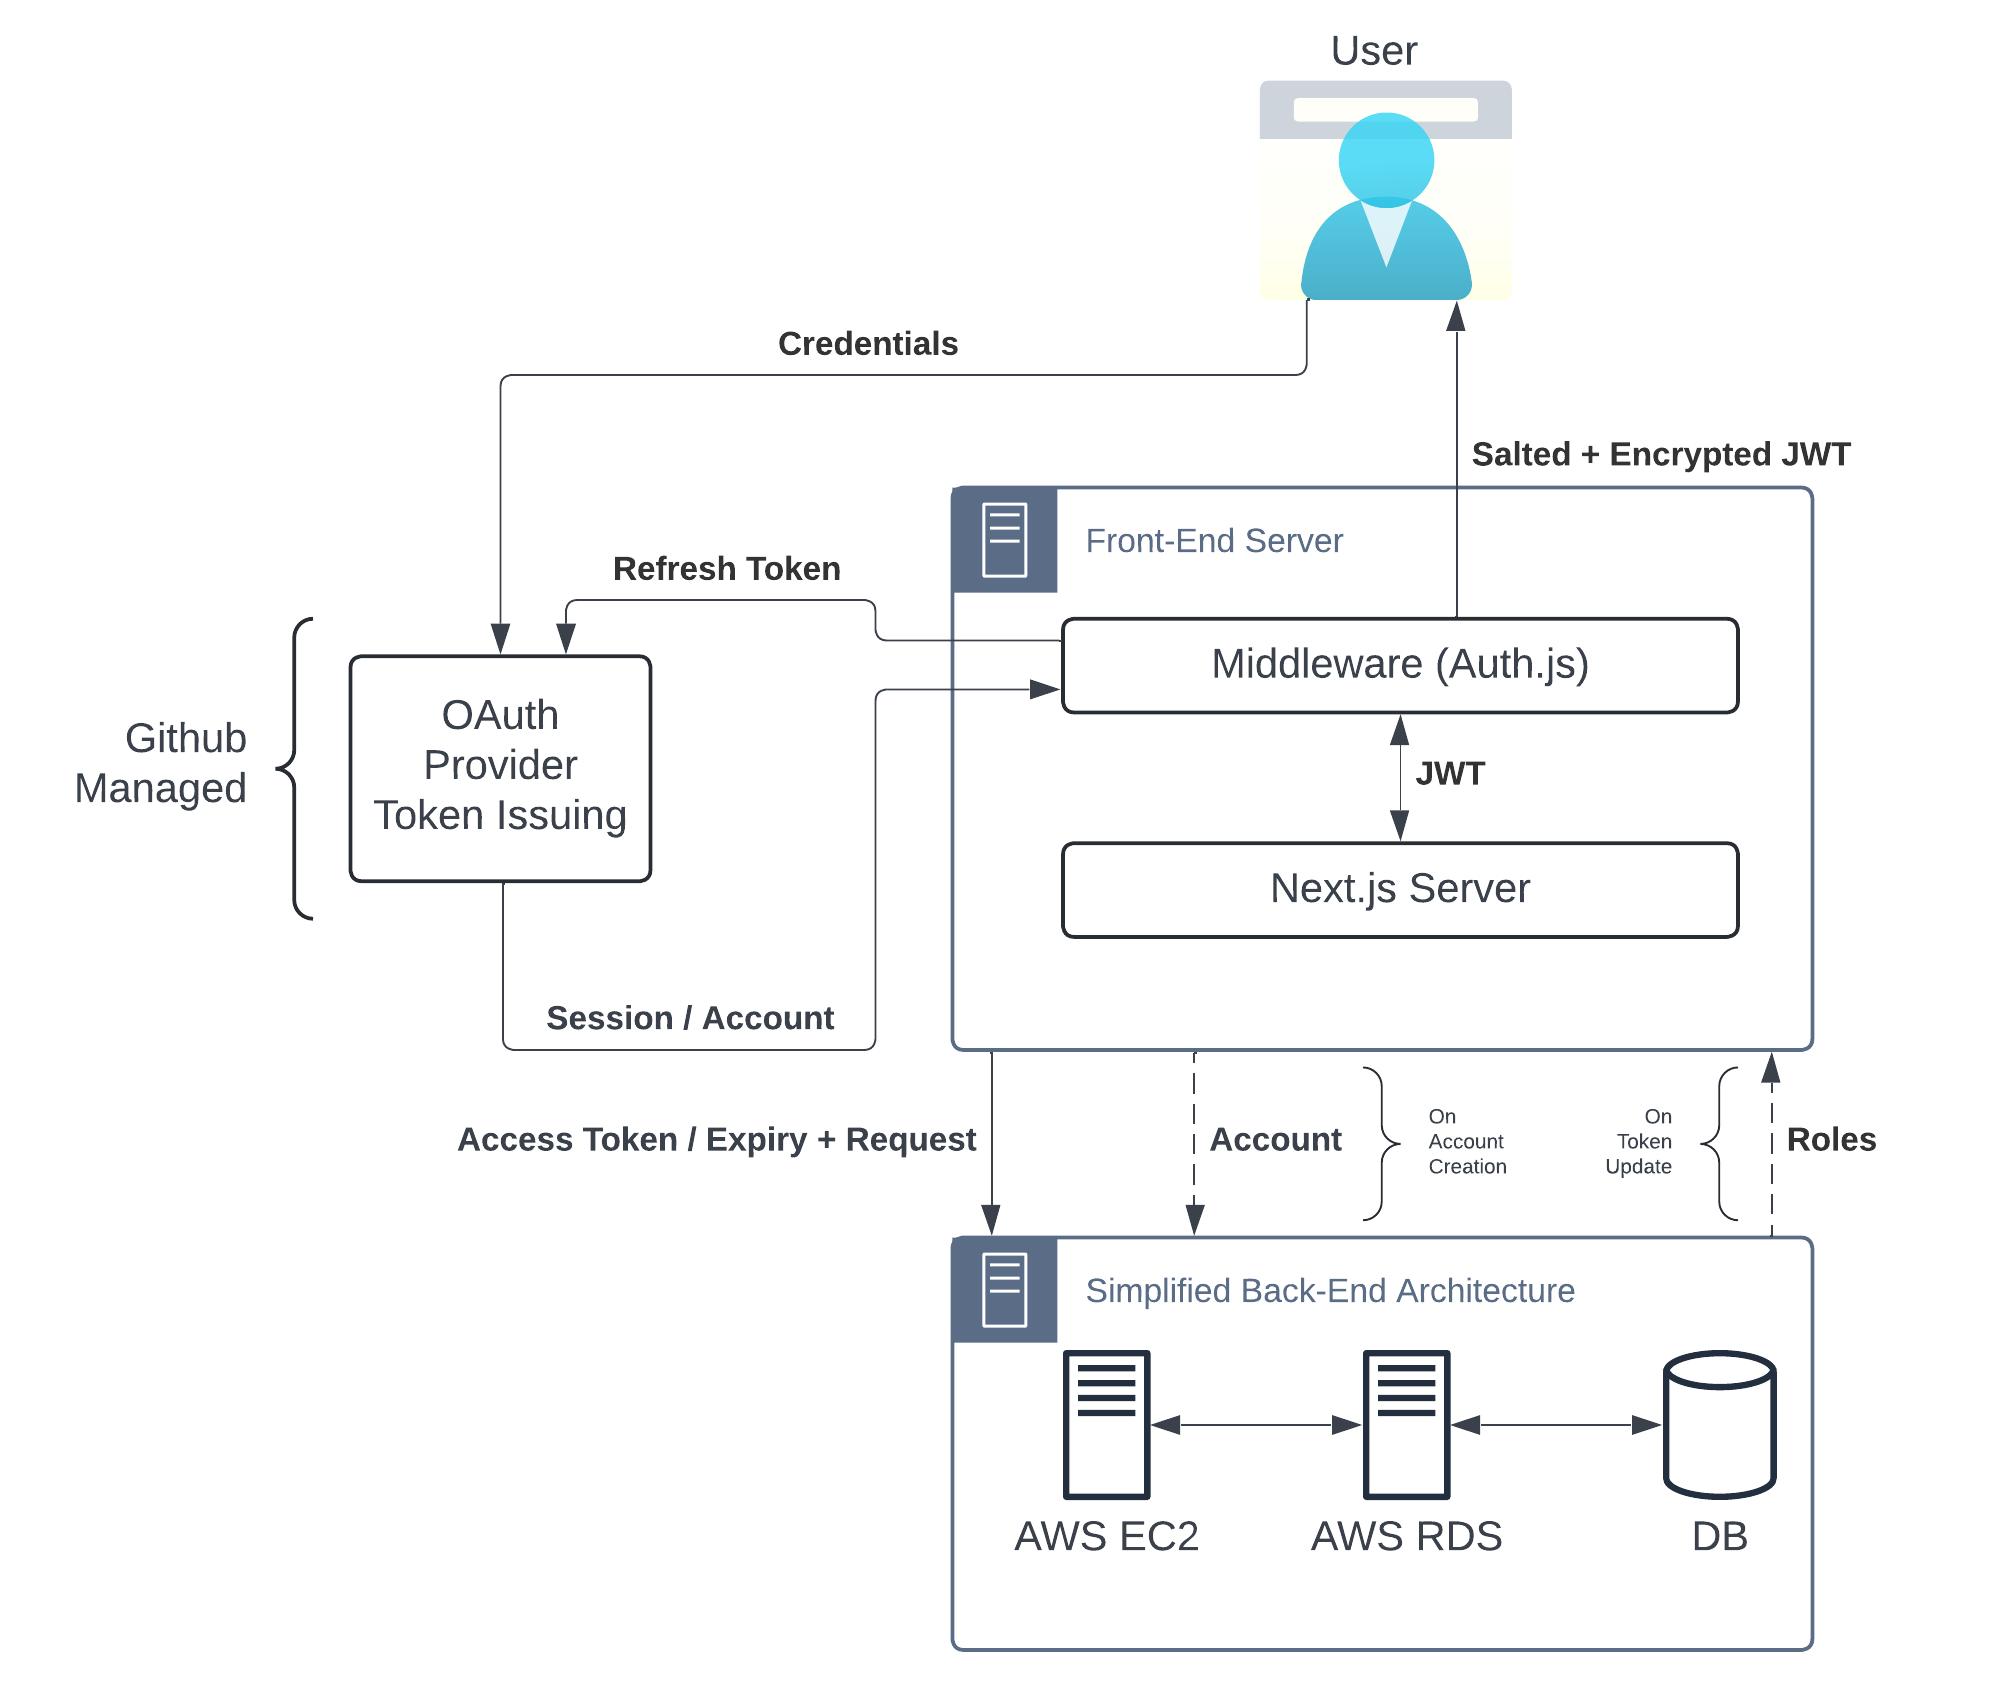
Figure 1
The flow between the front-end and the back-end has been simplified to highlight only the interactions between the servers which deal with authentication and authorization. After the JWT token is fully created, there is minimal interaction between the front-end and back-end regarding user accounts.
To summarize the above image, the OAuth Provider issues tokens given a user credentials and the associated Auth.js callback then packages these values into a basic JWT which is stored in the user's browser. The back-end takes these values and records them to the back-end and then returns the associated user's roles to the front-end which then augments the basic JWT with more specific information. Upon the user accessing any page with a valid JWT token, the server no longer makes requests to the back-end and simply uses the information within the JWT to make a decision regarding authentication and authorization. While that may leave the front-end susceptible to role-based vulnerabilities, the back-end has been designed to check the associated user roles on every request, making sure that information doesn't leak as a result of this decision.
Front-End Security
To start this post, let's finish up with the security mechanism on the front-end. I decided to use the Auth.js package as a middleware component that implemented the authorization and authentication methods used to protect pages where only an admin would expect access. Should any API routes be used (as would be expected for our temporary image staging mechanism), Auth.js would default to the usual method of checking valid session roles for proper authorization. Auth.js also provides integration with OAuth using a variety of providers, and Github was the provider of choice for this application due to its close proximity with its published front and back-end. This allowed me to gloss over the actual implementation of an OAuth server and delegate the security of the token issue algorithm to a source that I was confident is taking care of user security! Because of this, the security work has been reduced to ensuring the JWT token is up-to-date, storing any values should the access tokens be required elsewhere, and refreshing the tokens to allow for extended user logins without the need to login too frequently.
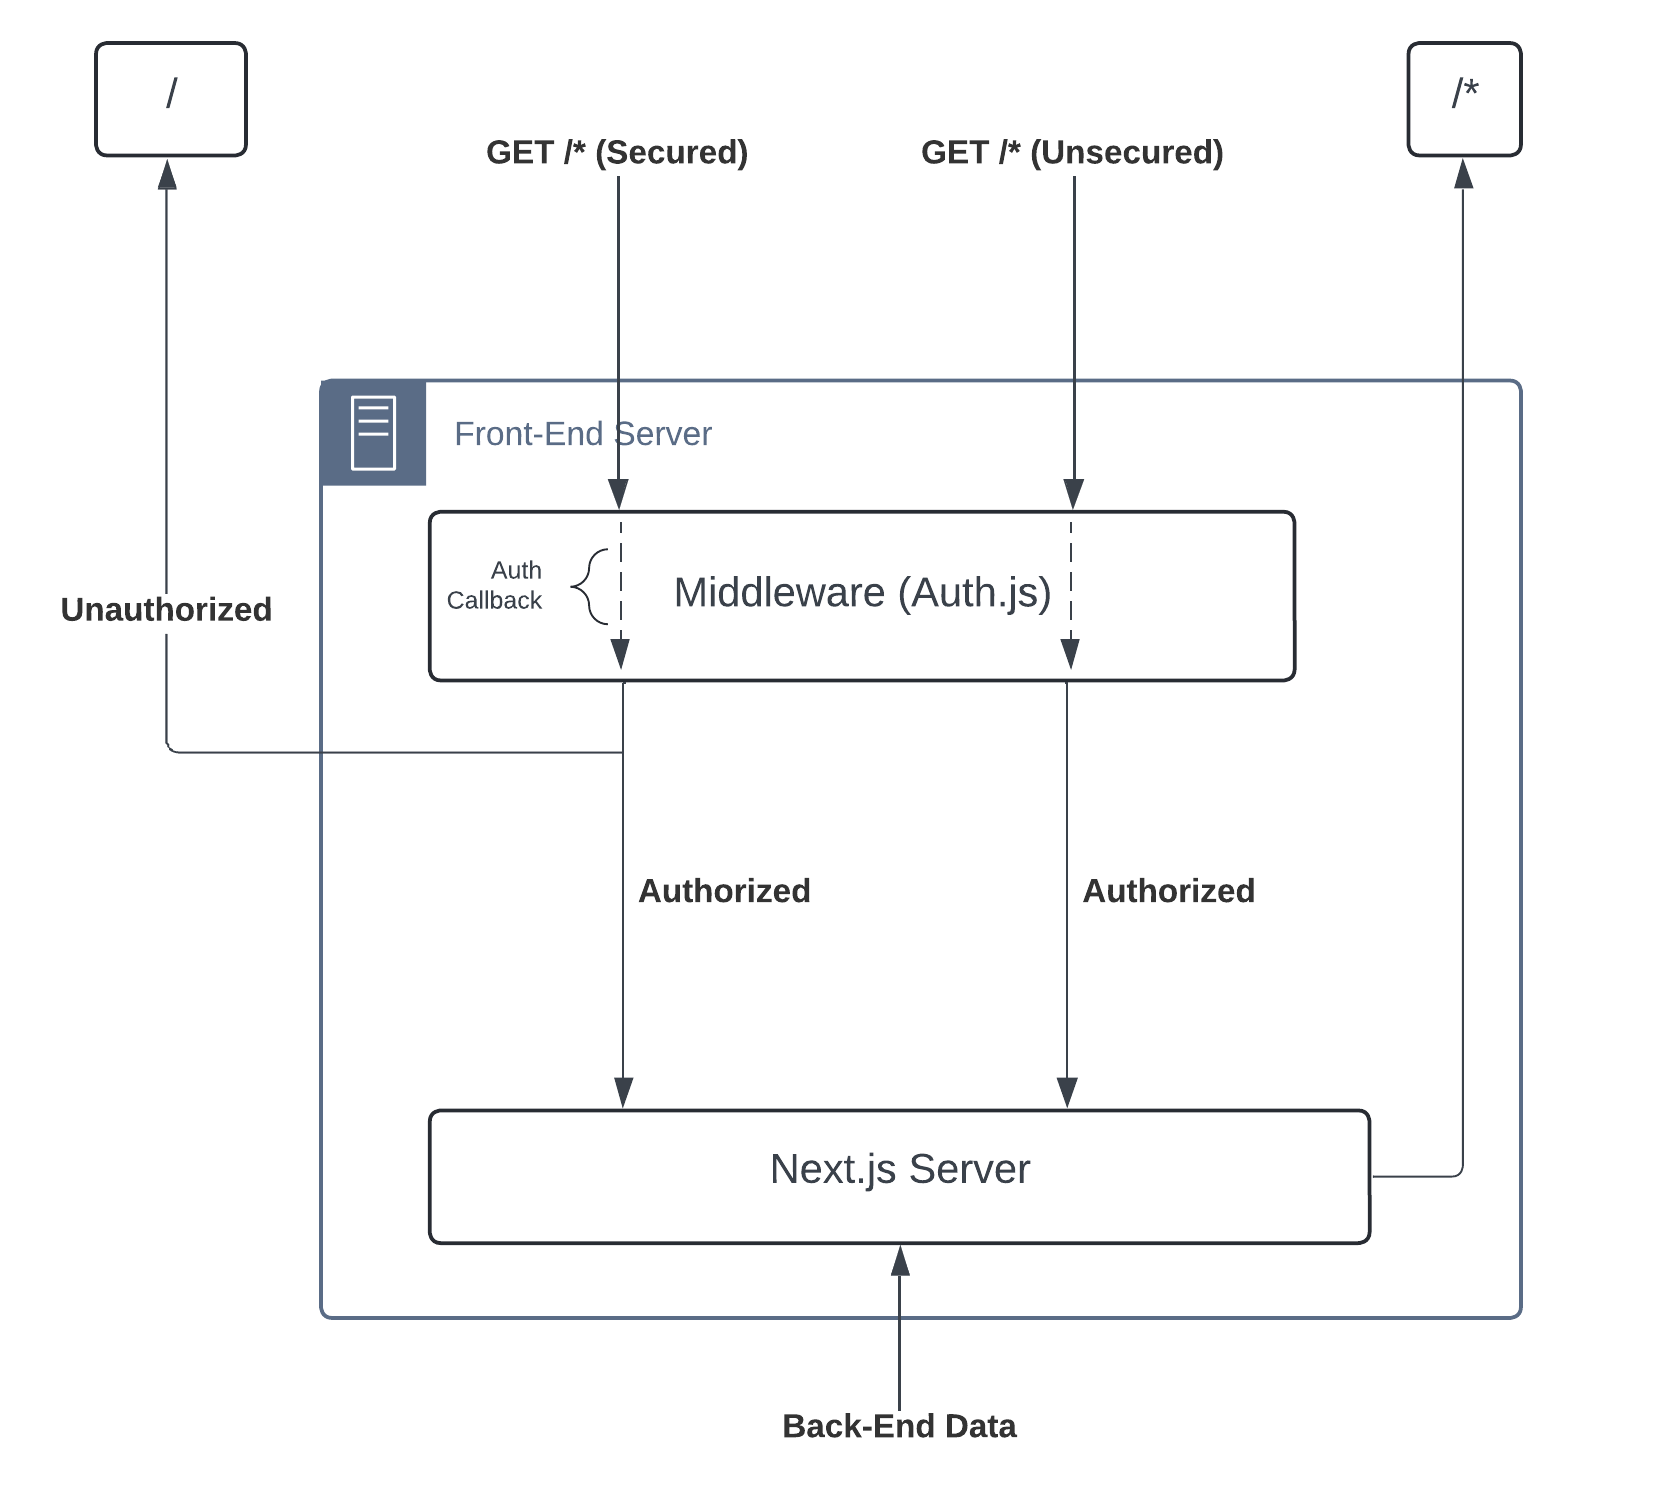
Figure 2
The flow of requests given the middleware implementation of Auth.js. Instead of manually checking sessions on all requests, it is delegated to a middleware "layer" configured with an all-encompassing callback that verifies the user meets given authorization levels for specified secure pages.
I can give a short overview on how the points above were implemented in the context of the entire implemented system. By using Auth.js as middleware, the site ensures that the first resource the user accesses is the security endpoint. Once the front-end server refreshes, accepts, or nullifies the token passed by the user following the JWT callback, the user is then provided the appropriate front-end rendered view with the appropriate elements hidden depending on their stored JWT token stored, if it still exists. For routes not covered by the middleware, the work of ensuring that the session is still alive is delegated to the route path implementation and rerouting must be managed manually. Of course, the session must still be managed on the back-end database as well if we want to ensure that expired or faulty tokens get rejected when sending requests to the back-end as well. To that end, an adapter connects our front-end to our database with the appropriate tables in order to allow for token management in the back-end (and add an extra layer of security to our back-end requests that the user can't necessarily brute force). Finally, token refreshes were fairly simple to implement. The JWT callback that runs each request that ensures the user has valid tokens can be modified again to refresh tokens once the access token has expired. Given that a refresh token has its associated expiration, we can simply ensure that the refresh token is still not expired before making the request, and the middleware can nullify the user's token if both the refresh and access tokens have expired (or on token refresh/update failure).
Database Connectivity
As stated before, the core of the back-end is a simple REST framework built on Spring Framework and hosted on AWS EC2. The database it interfaces with is an AWS RDS instance hosting an internal Postgres database available only to other AWS services. Database connectivity was fairly simple considering Spring Framework takes care of most of the work depending on the type of connection defined for the database. I was able to locally host a test MySQL database and swap to the settings used on the live server with a simple change of a single line in the typical application.properties file. This toggle defines a further application-{PROFILE}.properties file with deployment/testing specific rules for our ORM and connector that then loads a {PROFILE}.env file that contains the relevant critical infrastructure variables. They could have been placed together, but defining a dotenv file for others to create in order to recreate the server is far friendlier than defining it around spring's preference settings and defining what would essentially be constants for live-deployments or testing deployments.
Spring makes life significantly easier by automatically loading up the connector for the relevant database so long as the packages have been made available through Maven's pom.xml and the database link is a valid link. This connector defines the connectivity settings used for Hibernate ORM, which just so happens to be used as the default JPA provider and is also the one I have used extensively so there was no need to swap to a different one (although Spring for GraphQL seemed just as interesting and significantly easier to use and extend, if necessary). Given that Spring has no idea about the structure of our database tables, we define our model classes to define this structure and use them throughout the application along with the persistence layer to define our database. Repository classes allow us to define an extensible base set of queries without needing to define a DAO and work from the ground up to work with our model objects. With these elements, we now have basic the base set-up for which to build our service layer to provide selective access to portions of the underlying repository to the controller.
The second "database" connection made used for our CDN object management is done through the AWS SDK. We can import the S3 connector and define connectivity settings in our dotenv files and rely on the S3 client bean to build the appropriate interface for the requested bucket on-the-fly. Unlike an actual database, the connection is only kept alive for as long as is needed, and the client itself manages all concurrent requests and throws its own exceptions as needed. We can build a similar service layer to obscure some of the base client features like above, but there are a few peculiarities when dealing with the CDN. Namely, if an object in a given location is replaced with another that uses the same name, the CDN will serve the old cached object (if it was accessed previously) for a set amount of time unless an invalidation of the cache takes place. Unfortunately, cache invalidation costs money once a certain number of invalidation requests has been reached, so I decided to avoid the use of this feature via the SDK and figured the cache would become stale naturally under most scenarios.
Model Schema
For the initial deployment of this website, there are only two relevant schemas to explain. The first is the user/account management schema that is predefined by our middleware of choice, Auth.js. They did provide a basic representation of what the database should implement for proper functionality using their custom adapters. The following is the basic schema expected by the adapter interface:
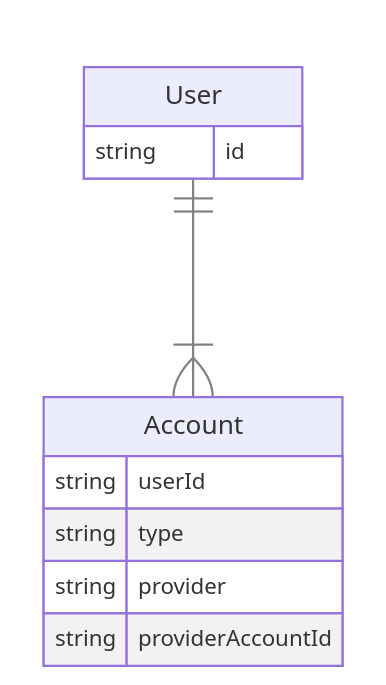
Figure 3
The template schema defined by Auth.js. It is extremely bare-bones and is expected to be extended depending on what is desired in terms of user experience and security.
As expected, the defaults are extremely simplified and only stare the bare minimum from the OAuth provider. With this setup, it's very unlikely that the system will recognize unique emails and properly associate them, so even Auth.js suggests adding multiple other fields to the User table in order to better associate related accounts. Along with that, there were a few other changes that I made to this schema in order to tackle some of the requirements that I had in place for the security side of things:
There needed to be a hands-free way of defining an admin account without relying on direct table manipulation in PSQL.
There should be roles defined and associated with a given user that can be retrieved using account information.
There should be some form of authorization implementable using account tokens that are associated with user roles.
So, 1) was addressed by creating an e-mail whitelist. This whitelist contains only my e-mail currently, but it can be used to define a set of roles/authorities for the database to assign to a new user with a given e-mail when being created by the front-end security. The list does nothing after creation, so it is not accessed frequently. Point 2) was addressed by creating a role table that contains a set of roles that can be associated with users. These roles define authorization rules for particular parts of the site, but there does exist a ROLE_GEN_ADMIN that will likely be unused that gives unrestricted access to all controller paths. Finally, point 3) was addressed by saving OAuth Provider access token values in the database along with their expiration. These token values would be used along with the rest of the JWT to define a given user during a request to the back-end and properly authorize them if they have the required role/authorities for the request. The following represents the schema as used up to this point of the blog for user and account management:
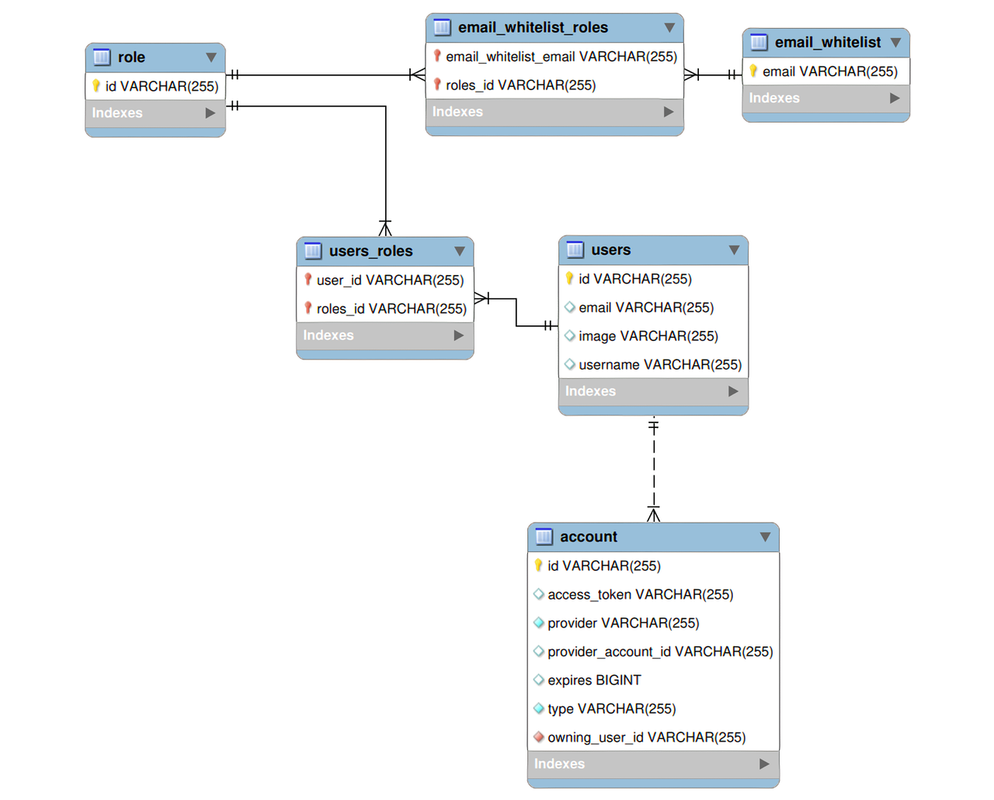
Figure 4
The implemented user and account management schema. It includes the base schema defined by Auth.js along with a few fields that were useful for display purposes along with others that were used to implement a few security requirements.
Finally, the second part of the database is currently dedicated to the blog and its associated posts and metadata. This was much simpler as there was no initial database schema to use as a base. As a simple CMS, all I needed to store was the relevant HTML content that represented the blog along with its title and relevant metadata. Blog tags were stored in a separate table and could be re-used for other posts, and image references were specific to given data posts and should be unique (given a specific blog post). The image references stored in that table references S3 specific content that is known to exist (as it's explicitly created given user passed requests for blog post updates) and content management is performed on the controller side (as persistence-related events were a pain to use to manage asynchronous activity). The schema for this half can be seen as follows:
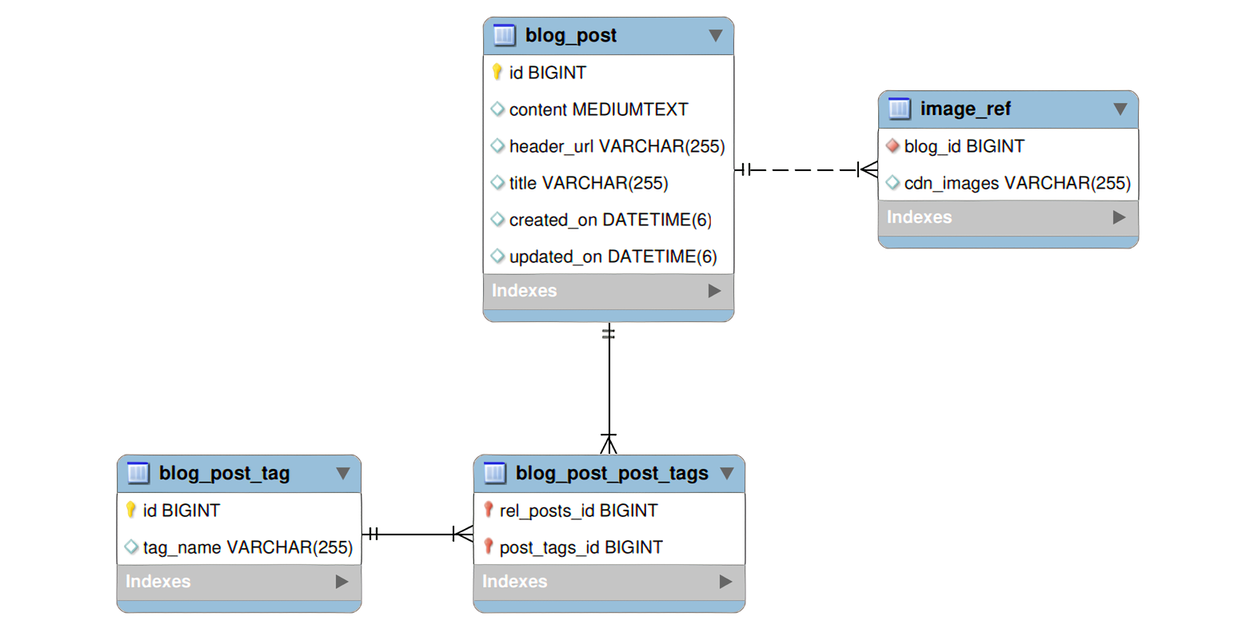
Figure 5
The implemented blog schema. It's quite simple and excludes the tables used internally by Spring for ID management.
There are a few modifications that can be made to both tables in order to potentially enhance the user experience, but for now these tables should suffice for storing all content. I plan on having a backup source that periodically backs the posts up in JSON format in order to have an easier time importing old content when new fields are present, but that will be covered later. For now, we can turn to our back-end security implementation.
Back-End Security
Much like the front-end, I delegated most of the management of the back-end security to either the infrastructure (so AWS load balancing for SSL/TLS encryption to the API endpoint) or Spring Framework Security for the software side of security. I will ignore the SSL/TLS side of things for now as it's not immediately relevant. The certificate is only used to allow for the HTTPS protocol to be used for all requests, but internally the REST server only sees an HTTP request that can be parsed without the need for decryption. Much like Auth.js, Spring Security is fairly opinionated and is initialized with a base set of configuration settings designed to allow Spring to host sessions given an associated username and password. However, most of these configurations had to be disabled in order to implement a session-less REST API that uses user access tokens as a mean of authentication and authorization.
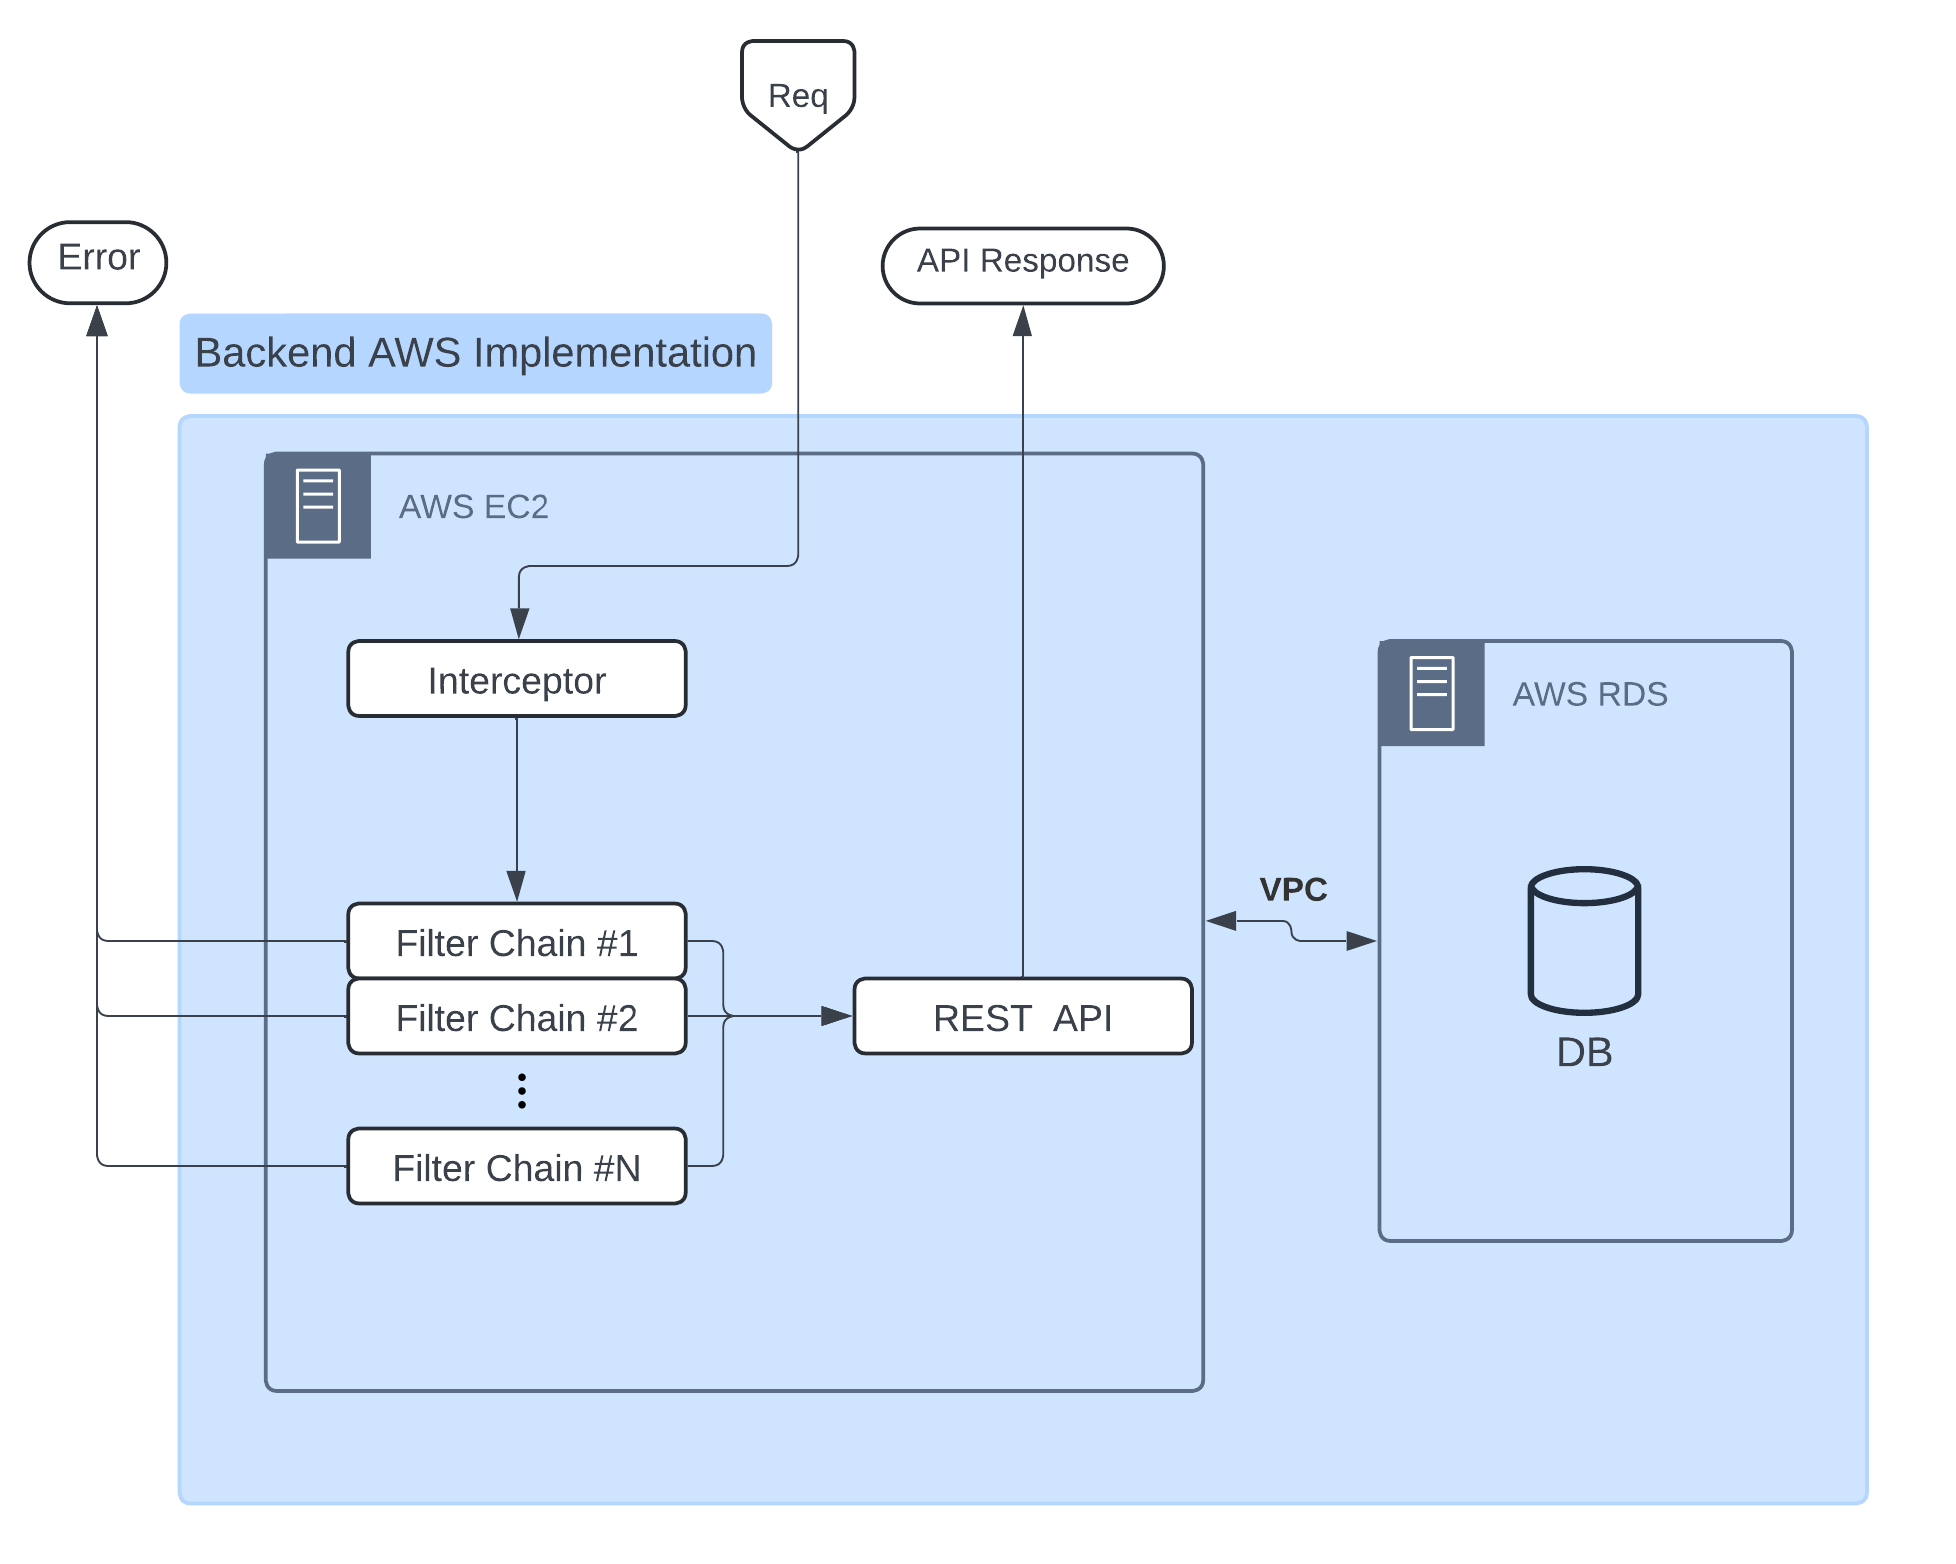
Figure 6
The general overview of how Spring Security functions in the context of protecting an API. The interceptor intercepts the user request and allows the request to make it to the REST API only if there exists a filter chain that allows the set up authorization and authentication parameters to access the given endpoint. The architecture itself is the default behavior provided by Spring.
To start, let's go over the default values that the Spring Security package provides when imported and initialized without any custom configuration settings within the annotated class. Authentication parameters are derived from a context created within the UsernamePasswordAuthenticationFilter which immediately follows a couple other filters that perform other actions such as intercept the user's request in order to authenticate and authorize, propagate exceptions to the user, and set-up mechanisms to deny cross-origin requests or prevent cross-site forgery attacks. From Spring's view, all of these are simply "filters" that allow a request to propagate through a chain that ultimately culminates in a final authentication check and forwarding of a request depending on the factors set by the authentication context injected into the security context bean. Once a user has been authenticated once, the framework returns a serialized cookie to the user's browser which is then used in place of the proposed credentials from the start. All of these configurations would be nice if we were working on a typical website implemented fully in Spring using a MVC framework, but that is not the case here. In order for our REST API to function as expected, we will need to manipulate several parts of this default configuration in order to set up a properly session-less and token-based back-end.
To start, the REST API must be session-less, meaning that there's no reason to keep the CSRF prevention filter or the session mechanism in place. The former can be adjusted by passing AbstractHttpConfigurer::disable to the csrf function of the security builder to remove the building mechanism from the final builder call. Similarly, enforcing a session-less application was done by passing the SessionCreationPolicy.STATELESS constant to the sessionManagement function of the security builder. Finally, to prevent our security system from sending back detailed authentication errors, we use the exceptionHandling function of the builder and pass it an exception management functor that returns a basic 403 response no matter the encountered authentication exception. Finally, in order for the generic non-path oriented filter to function as a proper REST API, I added a custom authentication processing filter, AccessTokenFilter, to the filter chain before the UsernamePasswordAuthenticationFilter. In order to ensure that the username and password authentication schema is never used, I also created a UserDetailsService implementation bean that throws a UsernameNotFound for all passed usernames so that the default service is completely disabled. In other words, our finalized security chain (without any authorization or path targeting settings in place), looks as follows:
return http
        .csrf(AbstractHttpConfigurer::disable)
        // and turn off session management as this is a token-based REST API
        .sessionManagement(session -> session
               .sessionCreationPolicy(SessionCreationPolicy.STATELESS))
        // make sure errors send back a 401 if an exception is found later in the chain
        .exceptionHandling(exception -> exception.authenticationEntryPoint(((request, response, authException) -> response.sendError(HttpServletResponse.SC_UNAUTHORIZED))))
        // and then add our access token filter before the dummy username auth filter
        .addFilterBefore(new AccessTokenFilter(accSvc), UsernamePasswordAuthenticationFilter.class)
        .authorizeHttpRequests(auth -> auth ... ) // filter authorizations would go here
        .build();
With this current implementation in place, as long as a user as authenticated, they can access all pages of the API page with unrestricted access. This is, of course, a security hazard so this return needed a few manipulations in place in order to be able to secure different API routes with different authorization settings. This was done by adding a securityMatcher function call to the builder and moving the authorization and build actions out of this function to create a security filter template. The securityMatcher function call basically tells Spring Security that it should only apply the following filter to the given path. If it fails, the filter chain is ignored and it moves to the next filter chain. I then constructed multiple filters using the template to guard specific API endpoints and associated the authentication with the relevant roles for those API endpoints. In the end, the filters had the following structure:
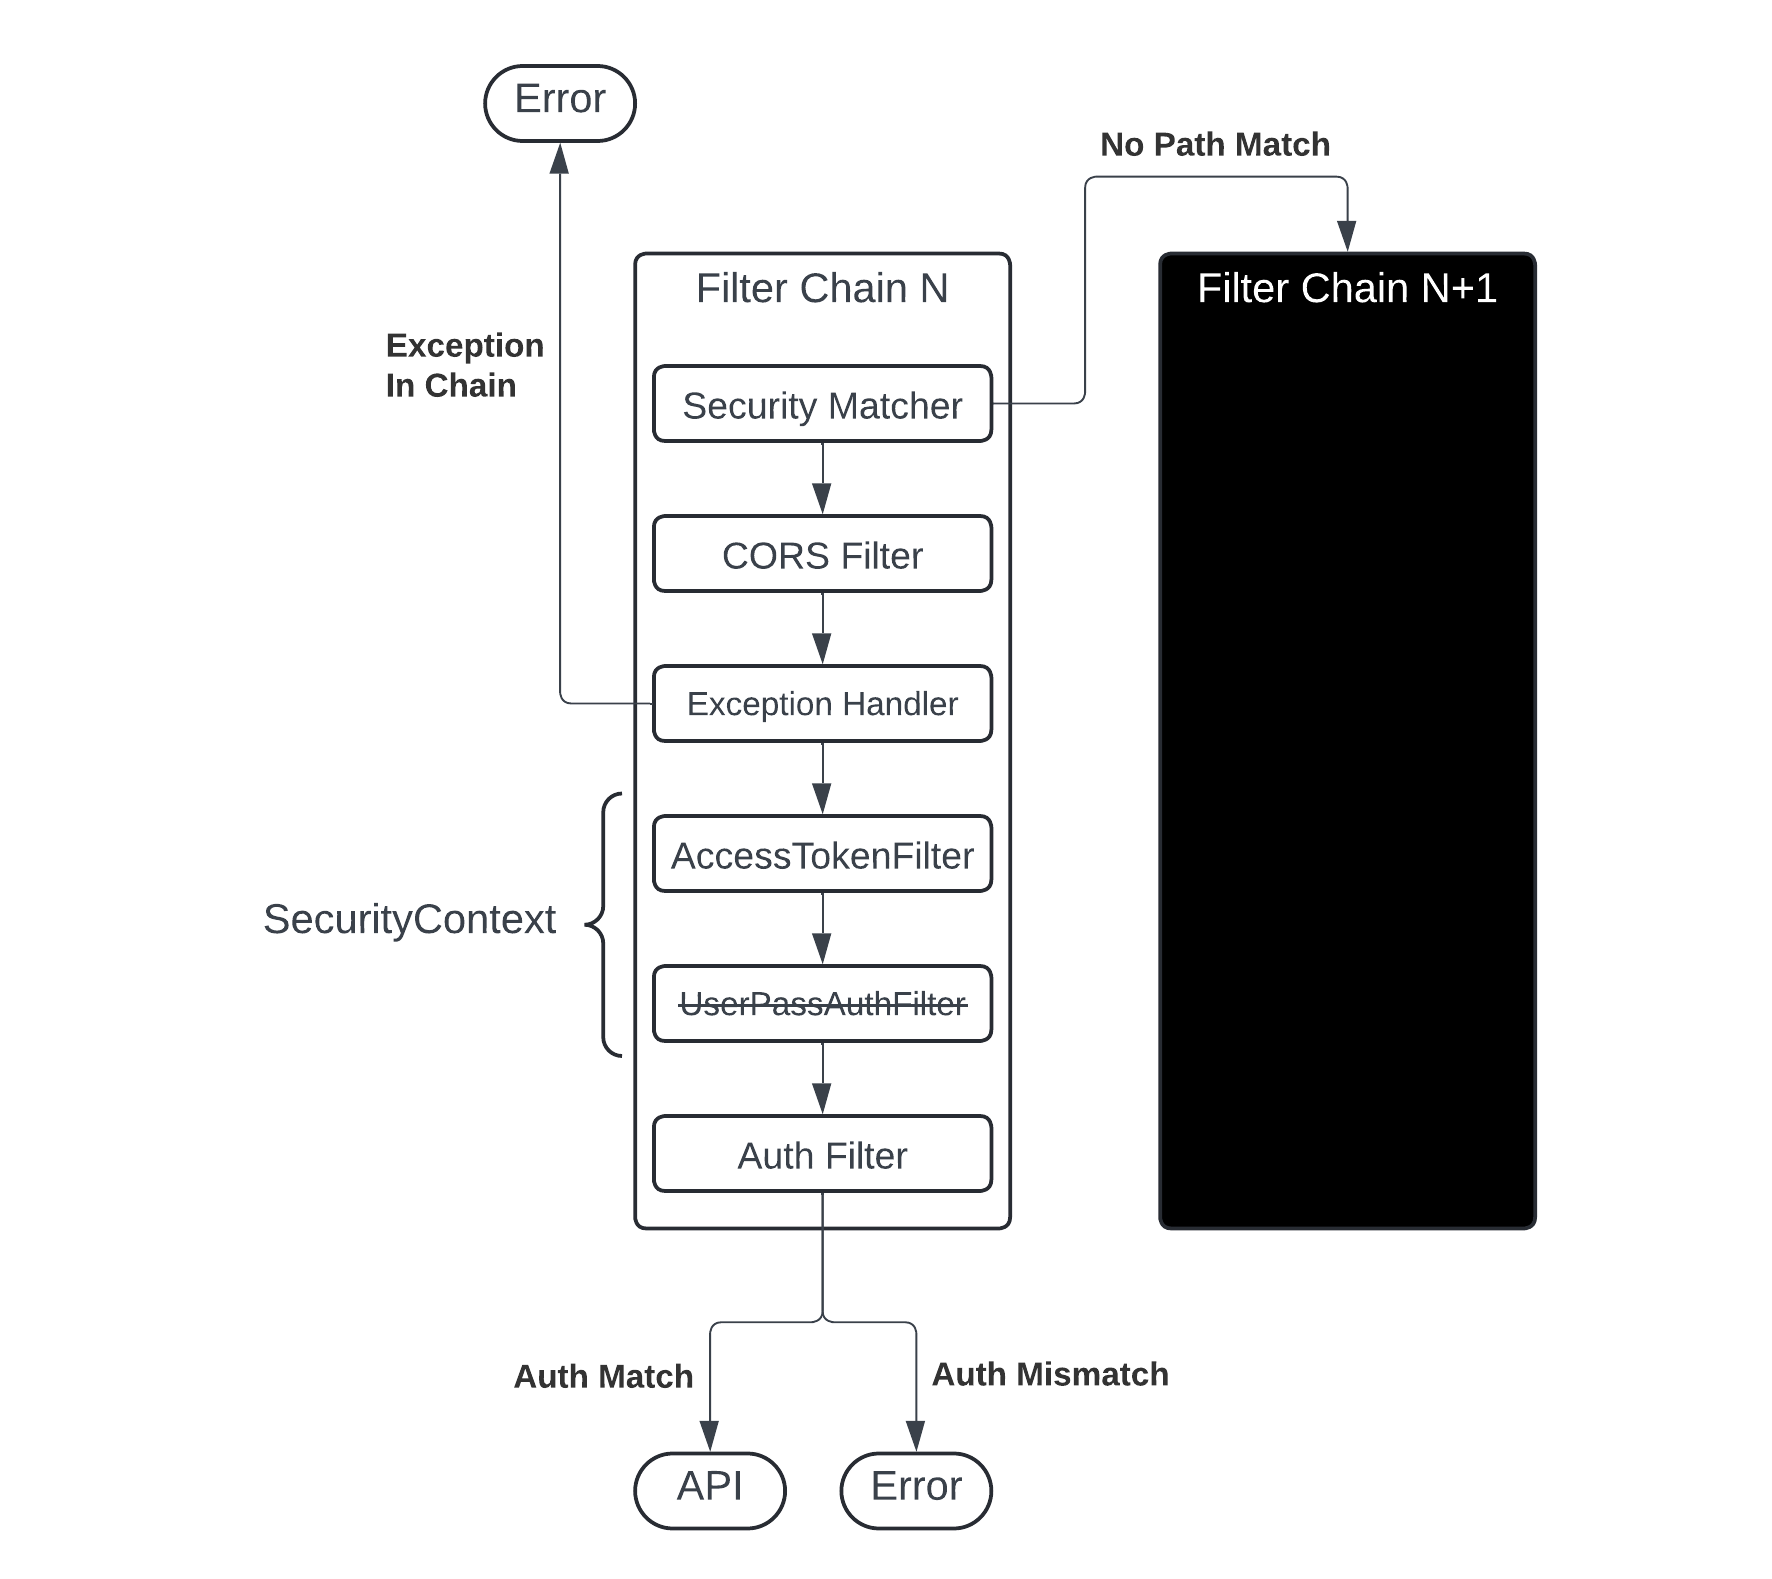
Figure 7
The overall architecture of the filter chain is customizable. For this site's implementation, I effectively disabled all functionality in the UserPassAuthFilter and use the AccessTokenFilter to manage the SecurityContext, which defines the user's authentication and authorization for the given request. Note that the filters executing in order is a Spring default action under the presence of multiple filters.
There are several filters of this type set to protect all relevant endpoints, and there exists a special filter that allows for access to the server health page without any credentials. This page exists solely for the infrastructure to function properly, and so it was a necessary filter to put into place. This filter sits at the very top with the lowest order value. The final filter, however, is an extremely restrictive filter that only allows access to any page with general administrator privileges. I don't believe it's a good idea to set such broad privileges; so, it is unlikely that this filter chain method will ever authenticate a user.
Closing Thoughts
The actual implementation of the back-end seems logically simple, but as it turns out there are a lot of details that are left to the programmer to identify. Spring Framework seems to do a lot of the hard lifting for us by providing sane defaults with its provided filters and filter structure, but the biggest issue with it is that the documentation is written in a way that only makes sense to someone who has become accustomed to building these security systems. That would be fine under normal circumstances where all one needs is a basic JWT management filter to co-exist with a username and password authentication system, but when the documentation has no information on how to build custom authorization filters by extending the OncePerRequestFilter interface, there is a clear hurdle that has been placed for users not accustomed to building these chains. Perhaps Spring can invest in better providing documentation for these APIs, but, until then, I guess the heavy trial and error approach is the only way to deal with the documentation issues.
On the other hand, Auth.js seems to resolve a lot of these issues by simply suggesting various extensions of their security mechanisms and providing some documentation and code to solve the most common problems users will expect. They seem to limit the amount of work that needs to be done by having the package be a bit more opinionated about how particular elements of the authorization process are managed. However, the nice part is that despite being opinionated, it is very specific about what it supports; and, given that this particular application only required what it supported, it made sense to use this particular package to implement the security on the front-end side.
Finally, there have actually been a few changes put into place with the data structures and server cache management methods since this post was drafted, but they consist of fairly minimal changes that are largely implementing a separation between drafts and posts (the only difference of which is that the former is not "published" to the blog yet). This should make it easier to begin working on a post and easily take it down and modify it without users being able to look at in-progress posts. Furthermore, I had to implement a few cache invalidation methods on the server end to complement this goal. The biggest reason is that caches seem to persist across launches, and under rare circumstances it would be possible for users to receive a cached version of page that no longer exists. (In fact, the only reason I realized this was an issue was because of cached content being served following a server wipe when it should have been force invalidated.)
